Creating Mod Browser Minimap Thumbnails
|
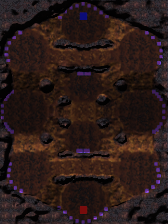
| Completed minimap for Samekh Valley |
Creating a minimap thumbnail for the Mod Browser is an important part of uploading and distributing a map. The process involves both the in-game minimap, and the elevation .tga file for depth, to reflect the nature of the map in game. This involves a screen capture utility and an image editor, such as GIMP or Photoshop.
Contents |
Step 1: Gathering the images
Getting the colour image
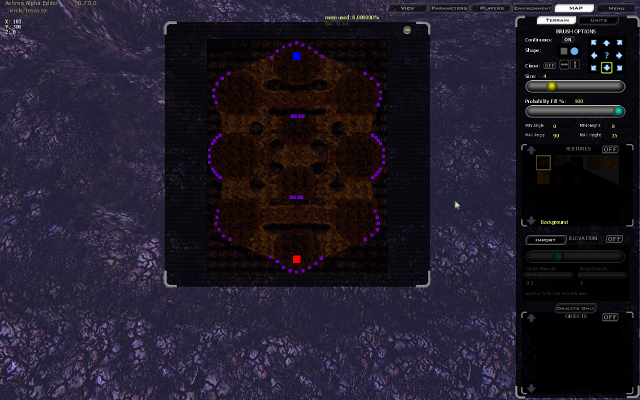
The first thing that needs to be done is to get an image of the in-game minimap. This requires taking a screen capture of the game while the minimap is enlarged. To do this, hit 'Tab' to get the large minimap, then use the screen capture tool to take the image. It should look something like this:
Getting the elevation image
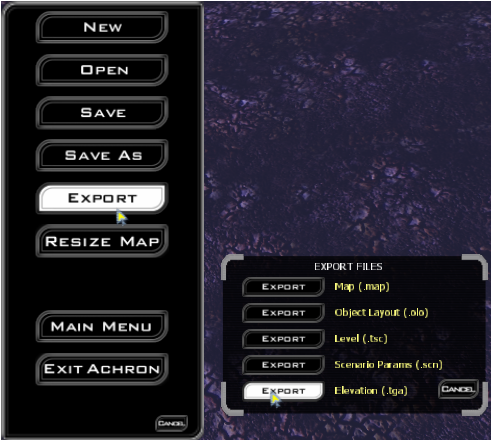
The second part of this is the elevation image. To get this, simply hit 'Esc' to bring up the menu, then go to Export -> Elevation and name the file.
Step 2: Organizing the images
Now that you have the necessary images, we need to combine them. For this tutorial I will demonstrate with GIMP, but for the most part Photoshop is similar enough.
Load the colour image and prepare it
First we need to load the images. Start with the colour image. You will need to select the minimap out of the image in order to crop it, like this:

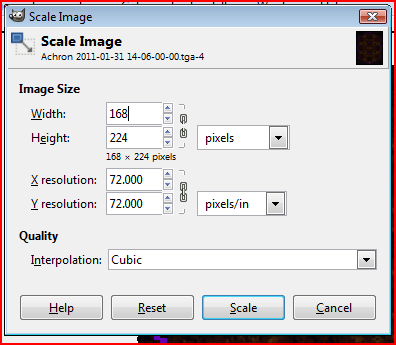
Once the minimap is selected, go to Image -> Crop to Selection. Then go to Image -> Scale Image... and set the dimensions to the dimensions of the map in game. You may need to click the link to stop GIMP from enforcing the current aspect ratio.
Load the elevation image and prepare it
Once this is complete, go to File -> Open as Layers... and select the elevation .tga file. As soon as it is loaded, go to Layer -> Crop to selection. This will make the bump map easier to make.

Step 3: Processing the images
The final step is to make the images work together.
Create the Bump Map
Before creating the bump map, it is a good idea to brighten the elevation map, especially if sections of it are completely black. Go to Colors -> Brightness/Contrast... and set to taste. As a rule of thumb, set the brightness high enough that the highest section is fully white, and contrast high enough that the different elevations look distinct. Also, in general, do not set contrast higher than brightness.
Once this is complete, go to Filters -> Map -> Bump Map... and set the parameters to taste. We want the shadows of the bump map to be visible when the image is multiplied on the colour image, so don't be shy with high depth and low elevation, but for the first few times it helps to test a few different parameter sets.

Merge and clean up
Once this is done, set the layer option from "Normal" to "Multiply". Your image will have an apparent depth, but will also probably be really dark. With the colour image layer selected, repeat the earlier Brightness/Contrast... step, making sure that the map is visible without making the colours overcontrasted.
The final step is to colour correct the image, to correct for the Brightness/Contrast change. Generally, you will only need to do this for the resource boxes, but in more 3+ player maps the start locations may also be changed. To do this, go to Colors -> Hue/Saturation..., select Magenta, and modify the hue until it is the old neutral player colour. Generally this involves reducing hue by about 10° or 15°.
Once you are done, save to a web format (.jpg, .png, .gif, etc. I recommend .png).
Step 4: Upload
Once you have created the mod package, upload the thumbnail to the package, and click on the "Set" link next to it. Next time you look at the package, you will see your brand new thumbnail.
Notes
- The brightness of the minimap is directly related to the Fog Color. If this is higher, the minimap will be brighter, but the image may not end up matching how the map looks as well. If Brightness/Contrast doesn't make the map bright enough without killing the colours, try increasing Fog Color, saving, and reloading to take the screenshot again.
- When resizing the minimap colour image, Lanczos3 tends to overcompensate and blur the image compared to other interpolation methods, but experiment overall.